
ReentrantLock和synchorized
大约 10 分钟
1 ReentrantLock
ReentrantLock 是一种独占式的可重入锁,位于java.util.concurrent.locks中,是Lock接口的默认实现类,底部的同步特性基于AQS实现,和synchronized关键字类似,但更灵活、功能更强大、也是目前实战中使用频率非常高的同步类。
1.1 示例
public class LockTest {
    private ReentrantLock lock = new ReentrantLock();

    public String lock1() {
        try {
            lock.lock();
            System.out.println("lock1获取锁");
            TimeUnit.SECONDS.sleep(5);
        } catch (InterruptedException e) {
            e.printStackTrace();
        } finally {
            lock.unlock();
            System.out.println("lock1释放锁");
        }
        return "SUCCESS";
    }

    public String lock2() {
        try {
            lock.lock();
            System.out.println("lock2获取锁");
            TimeUnit.SECONDS.sleep(5);
        } catch (InterruptedException e) {
            e.printStackTrace();
        } finally {
            lock.unlock();
            System.out.println("lock2释放锁");
        }
        return "SUCCESS";
    }

    public static void main(String[] args) {
        LockTest test = new LockTest();
        new Thread(() -> test.lock1()).start();
        new Thread(() -> test.lock2()).start();
    }
}
1.2 阻塞和唤醒
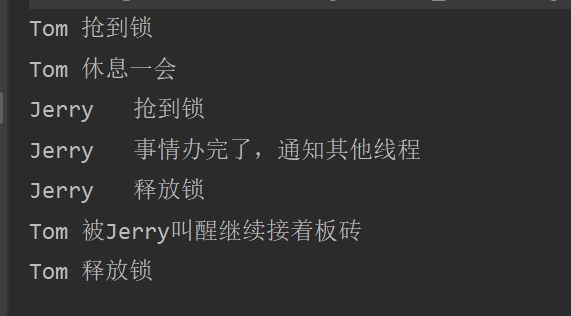
ReentrantLock通过Condition来控制线程得阻塞和唤醒
ReentrantLock lock = new ReentrantLock();
Condition condition = lock.newCondition();
new Thread(() -> {
    try {
        lock.lock();
        System.out.println(Thread.currentThread().getName() + "\t抢到锁");
        Thread.sleep(1000);
        System.out.println(Thread.currentThread().getName() + "\t休息一会");
        condition.await();//阻塞在这里,等待condition的signal唤醒
        System.out.println(Thread.currentThread().getName() + "\t被Jerry叫醒继续接着板砖");
    } catch (Exception e) {
        e.printStackTrace();
    } finally {
        System.out.println(Thread.currentThread().getName() + "\t释放锁");
        lock.unlock();
    }
}, "Tom").start();

Thread.sleep(1000);

new Thread(() -> {
    try {
        lock.lock();
        System.out.println(Thread.currentThread().getName() + "\t抢到锁");
        Thread.sleep(1000);
        System.out.println(Thread.currentThread().getName() + "\t事情办完了,通知其他线程");
        condition.signal();// 唤醒其他线程
    } catch (Exception e) {
        e.printStackTrace();
    } finally {
        System.out.println(Thread.currentThread().getName() + "\t释放锁");
        lock.unlock();
    }
}, "Jerry").start();
控制台执行结果
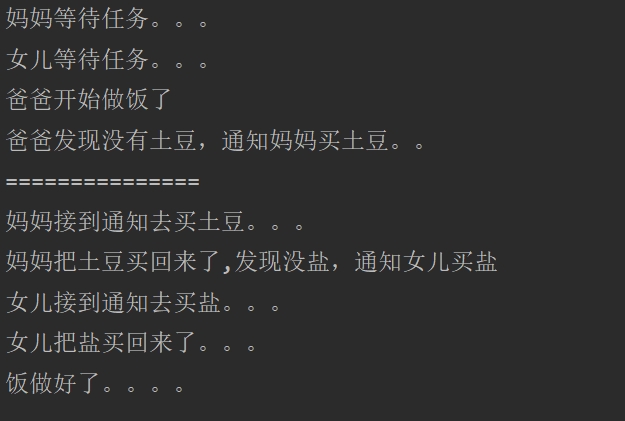
Condition顺序通知
ReentrantLock lock = new ReentrantLock();
Condition dad = lock.newCondition();
Condition mom = lock.newCondition();
Condition daughter = lock.newCondition();
AtomicInteger atomicInteger = new AtomicInteger(0);

private void cook() {
    try {
        Thread.sleep(1000);

        lock.lock();
        while (atomicInteger.get() != 0) {
            dad.await();
        }
        System.out.println(Thread.currentThread().getName() + "开始做饭了");
        atomicInteger.incrementAndGet();
        System.out.println(Thread.currentThread().getName() + "发现没有土豆,通知妈妈买土豆。。");
        mom.signal();
        while (atomicInteger.get() != 3) {
            System.out.println("===============");
            dad.await();
        }

    } catch (Exception e) {
        e.printStackTrace();
    } finally {
        System.out.println("饭做好了。。。。");
        lock.unlock();
    }
}

private void byTomato() {
    try {
        System.out.println(Thread.currentThread().getName() + "等待任务。。。");
        lock.lock();
        while (atomicInteger.get() != 1) {
            mom.await();
        }
        System.out.println(Thread.currentThread().getName() + "接到通知去买土豆。。。");
        System.out.println(Thread.currentThread().getName() + "把土豆买回来了,发现没盐,通知女儿买盐");
    } catch (Exception e) {
        e.printStackTrace();
    } finally {
        atomicInteger.incrementAndGet();
        daughter.signal();
        lock.unlock();
    }
}


private void bySalt() {
    try {
        System.out.println(Thread.currentThread().getName() + "等待任务。。。");
        lock.lock();
        while (atomicInteger.get() != 2) {
            daughter.await();
        }
        System.out.println(Thread.currentThread().getName() + "接到通知去买盐。。。");
        System.out.println(Thread.currentThread().getName() + "把盐买回来了。。。");
    } catch (Exception e) {
        e.printStackTrace();
    } finally {
        atomicInteger.incrementAndGet();
        dad.signal();
        lock.unlock();
    }
}


public static void main(String[] args) throws InterruptedException {
    LockConditionDemo lockConditionDemo = new LockConditionDemo();
    new Thread(() -> lockConditionDemo.cook(), "爸爸").start();
    new Thread(() -> lockConditionDemo.byTomato(), "妈妈").start();
    new Thread(() -> lockConditionDemo.bySalt(), "女儿").start();

}
控制台运行结果
1.3 注意事项
- await需要与signal成对出现,否则会造成线程一致阻塞,没有唤醒操作
- await和signal方法需要在持有锁的情况下执行
- 先执行signal,再执行await会造成线程一致阻塞
1.4 源码解析
1) 类关系图
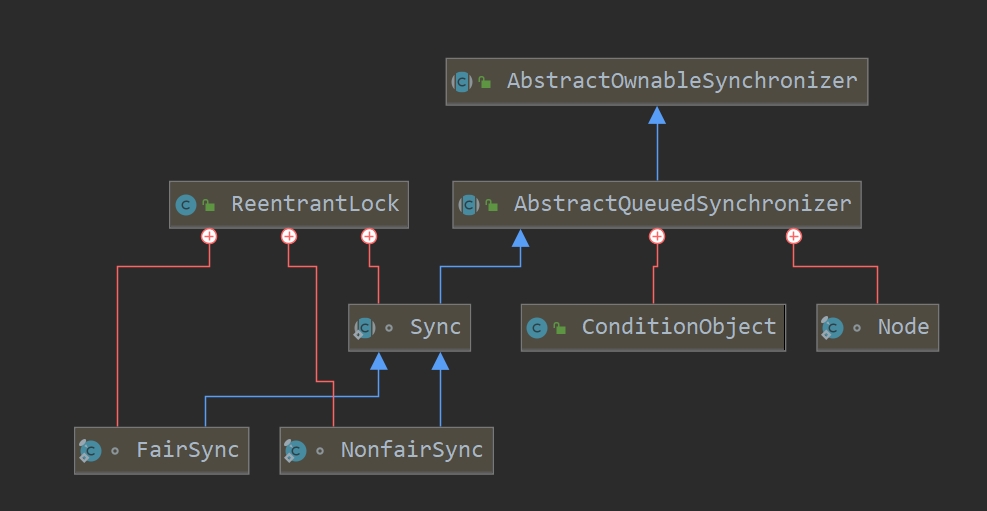
2) ReentrantLock结构
class ReentrantLock{
    private final Sync sync;

    // 静态抽象内部类Sync,继承了AQS
    abstract static class Sync extends AbstractQueuedSynchronizer {}

    // 静态内部类NonfairSync,继承了Sync。非公平锁的实现
    static final class NonfairSync extends Sync {}

    // 静态内部类FairSync,继承Sync。公平锁的实现
    static final class FairSync extends Sync {}

    // 无参构造方法,默认创建了非公平锁
    public ReentrantLock() {
        sync = new NonfairSync();
    }

    // 有参构造,根据传入的boolean类型,决定创建公平还是非公平锁
    public ReentrantLock(boolean fair) {
        sync = fair ? new FairSync() : new NonfairSync();
    }

    public void lock() {
        sync.lock();
    }
    public void unlock() {
        sync.release(1);
    }
}
3) AbstractQueuedSynchronizer
抽象的队列同步器,简称AQS。ReentrantLock的核心就是通过AQS来实现的。
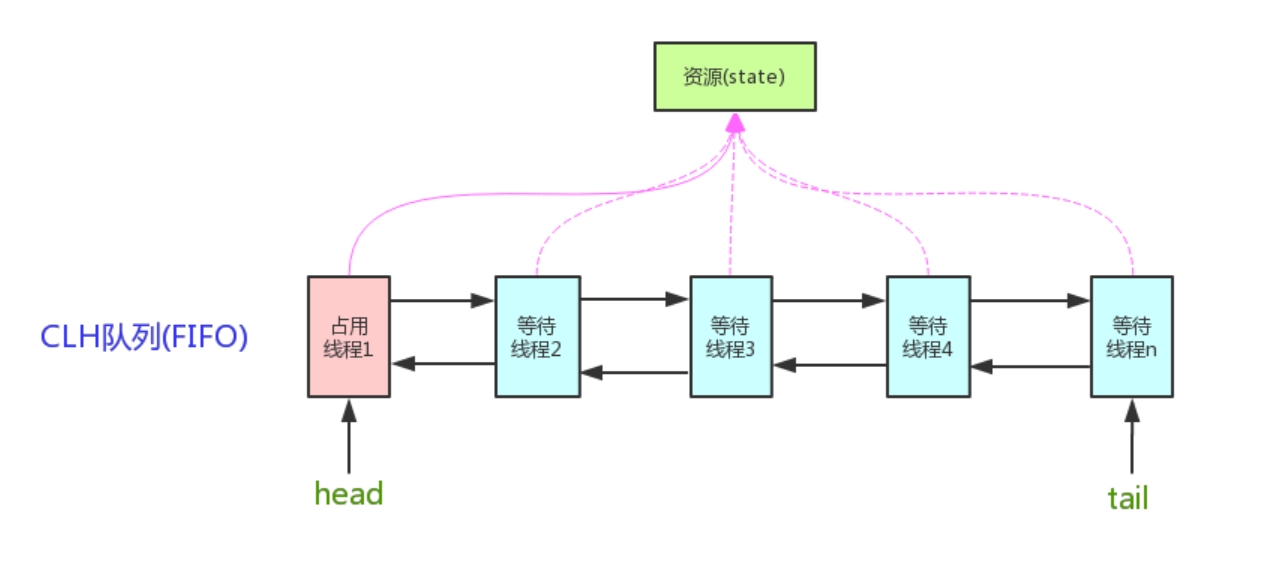
AbstractQueuedSynchronizer结构
abstract AbstractQueuedSynchronizer{
    /*
     * state=1,代表当前锁已被持有
     * state=0,代表当前没有线程持有
     */
    private volatile int state;

    // 链表尾节点
    private transient volatile Node tail;

    // 链表头节点
    private transient volatile Node head;

    static final class Node {
        // Node节点的状态值
        volatile int waitStatus;

        // 前置节点
        volatile Node prev;

        // 后置节点
        volatile Node next;

    	// 下个等待的节点
    	Node nextWaiter;

        // 当前节点的线程
        volatile Thread thread;
    }

    // Used by addWaiter
    Node(Thread thread, Node mode) {
        this.nextWaiter = mode;
        this.thread = thread;
    }
}
4) 从lock方法出发,以非公平锁为例
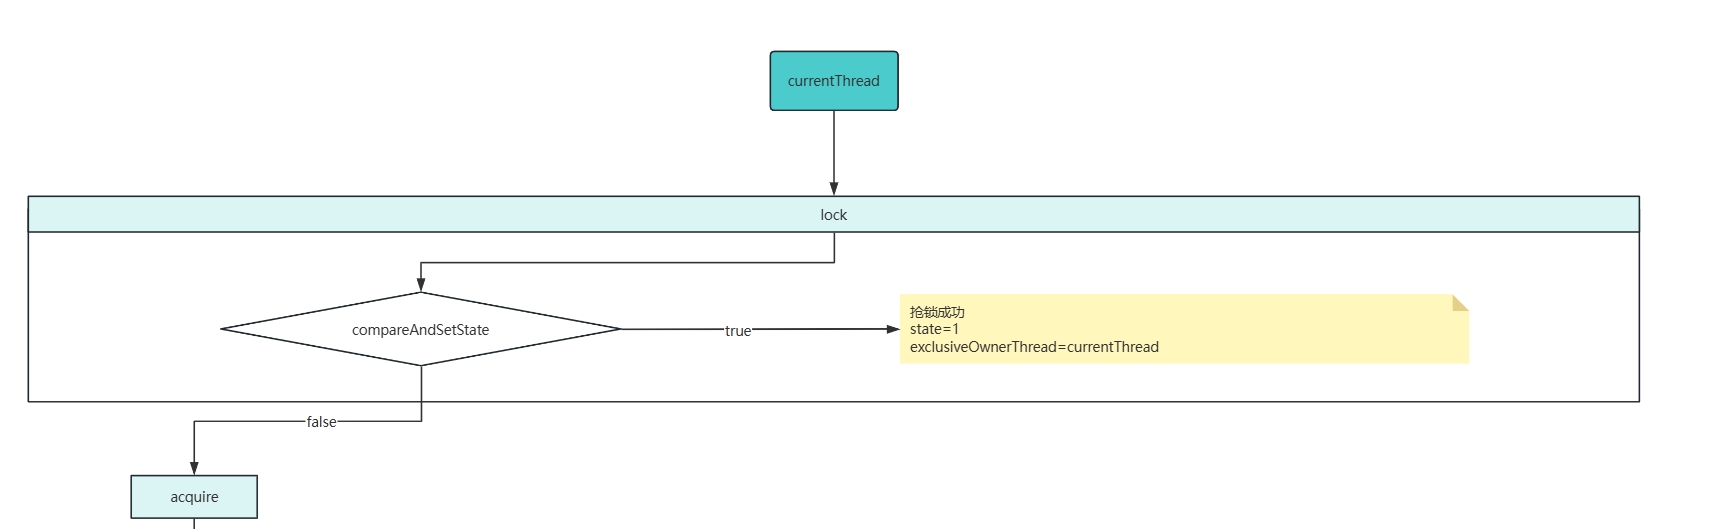
final void lock() {
    /*
    * 调用AQS的compareAndSetState,该方法使用cas来保证了操作的原子性。
    * 将AQS的state变量从0改为1,
    * 返回true,代表获取到锁,否则失败。
    */
    if (compareAndSetState(0, 1))
        /*
         * state修改成功,设置独占资源的线程为当前线程
         * setExclusiveOwnerThread方法是AbstractOwnableSynchronizer类方法
         * AbstractOwnableSynchronizer一个抽象类,也是AQS的父类
         */
        setExclusiveOwnerThread(Thread.currentThread());
    else
        /*
         * 修改state变量失败
         * 进入AQS的acquire方法
         */
        acquire(1);
}
4.1) AQS的acquire方法
public final void acquire(int arg) {
    /*
     * 这里执行三个方法
     * tryAcquire 再次尝试获取锁
     * addWaiter  创建Node节点,进入等待队列
     * acquireQueued 执行线程阻塞
     */
    if (!tryAcquire(arg) &&
        acquireQueued(addWaiter(Node.EXCLUSIVE), arg))
        selfInterrupt();
}
AQS的tryAcquire方法是直接抛出了异常
protected boolean tryAcquire(int arg) {
    throw new UnsupportedOperationException();
}
NonfairSync重写了tryAcquire方法,
// 重写AQS的tryAcquire方法
protected final boolean tryAcquire(int acquires) {
    return nonfairTryAcquire(acquires);
}
重写的方法里直接调用了Sync类的nonfairTryAcquire方法

final boolean nonfairTryAcquire(int acquires) {
    // 拿到当前线程
    final Thread current = Thread.currentThread();
    // 获取AQS的state变量值
    int c = getState();
    if (c == 0) {
        // state==0,代表当前没有线程持有锁,这里就尝试获取锁
        if (compareAndSetState(0, acquires)) {
            setExclusiveOwnerThread(current);
            return true;
        }
    }
    else if (current == getExclusiveOwnerThread()) {
        // 如果当前线程等于持有锁的线程,这里就是锁的重入。进入一次则+1
        int nextc = c + acquires;
        if (nextc < 0) // overflow
            throw new Error("Maximum lock count exceeded");
        // 这里修改的是AQS的state值
        setState(nextc);
        return true;
    }
    // 条件都不满足,则返回false
    return false;
}
4.2) addWaiter方法(tryAcquire返回false,取反则继续执行此方法)
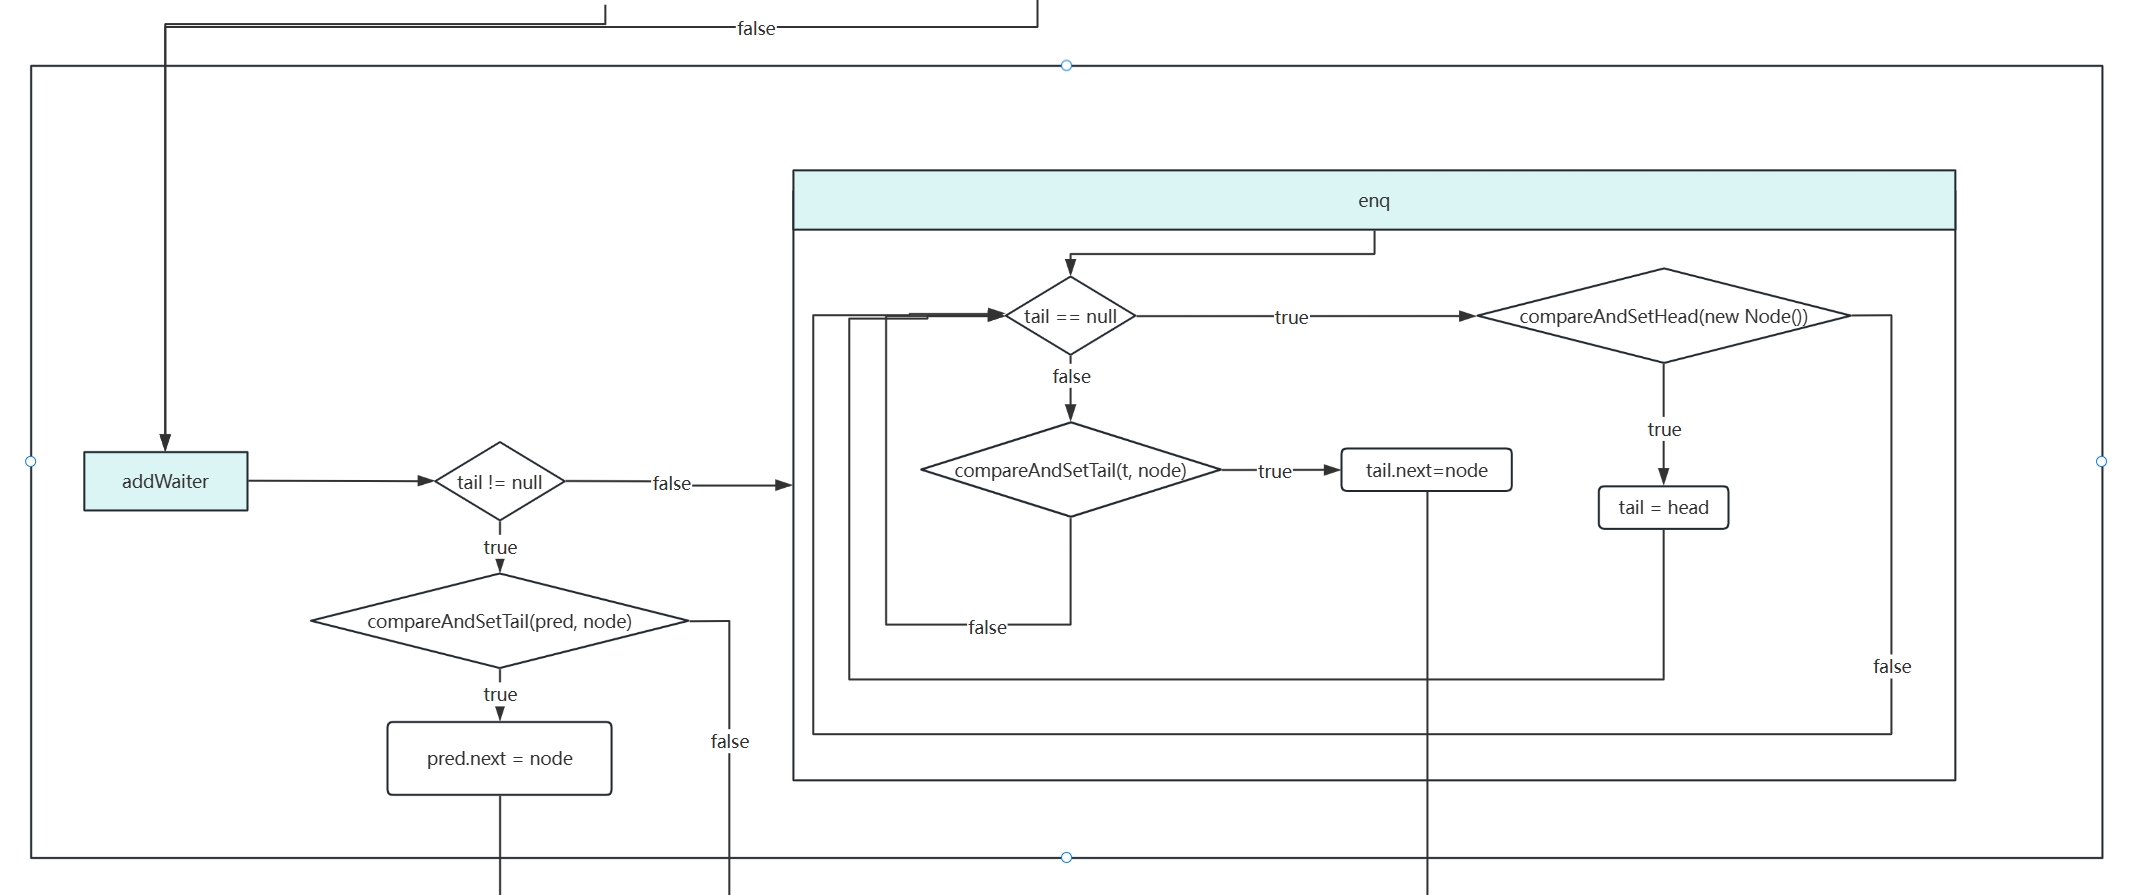
/*
* 传入的mode值为Node.EXCLUSIVE
* Node.EXCLUSIVE = null
* 所以传入的mode = null
*/
private Node addWaiter(Node mode) {
// 创建Node节点
Node node = new Node(Thread.currentThread(), mode);
// tail=尾节点
Node pred = tail;
if (pred != null) {
// 设置新节点的前置节点=尾节点
node.prev = pred;
// CAS操作,将尾节点修改为创建的新节点
if (compareAndSetTail(pred, node)) {
// 之前尾节点的后置节点=创建的新节点
pred.next = node;
// 返回创建的新节点
return node;
}
}
// 尾节点==null,进入链表的初始化
enq(node);
// 返回创建好的节点
return node;
}
// 链表初始化操作
private Node enq(final Node node) {
for (;;) {
Node t = tail;
if (t == null) { // Must initialize
// 尾节点==null,执行初始化操作
if (compareAndSetHead(new Node())) // CAS操作,创建一个空节点,并使头节点=创建的空节点
tail = head;// 尾节点=头节点,这时首尾都是这个空节点
} else {
// 循环第二次,此时链表初始化已完成
node.prev = t; // 创建的节点的前置节点=尾节点
if (compareAndSetTail(t, node)) {// CAS操作,将尾节点设置为创建的新节点
t.next = node; // 之前尾节点的后置节点设置为创建的新节点。此时创建的新节点入链完成
return t;
}
}
}
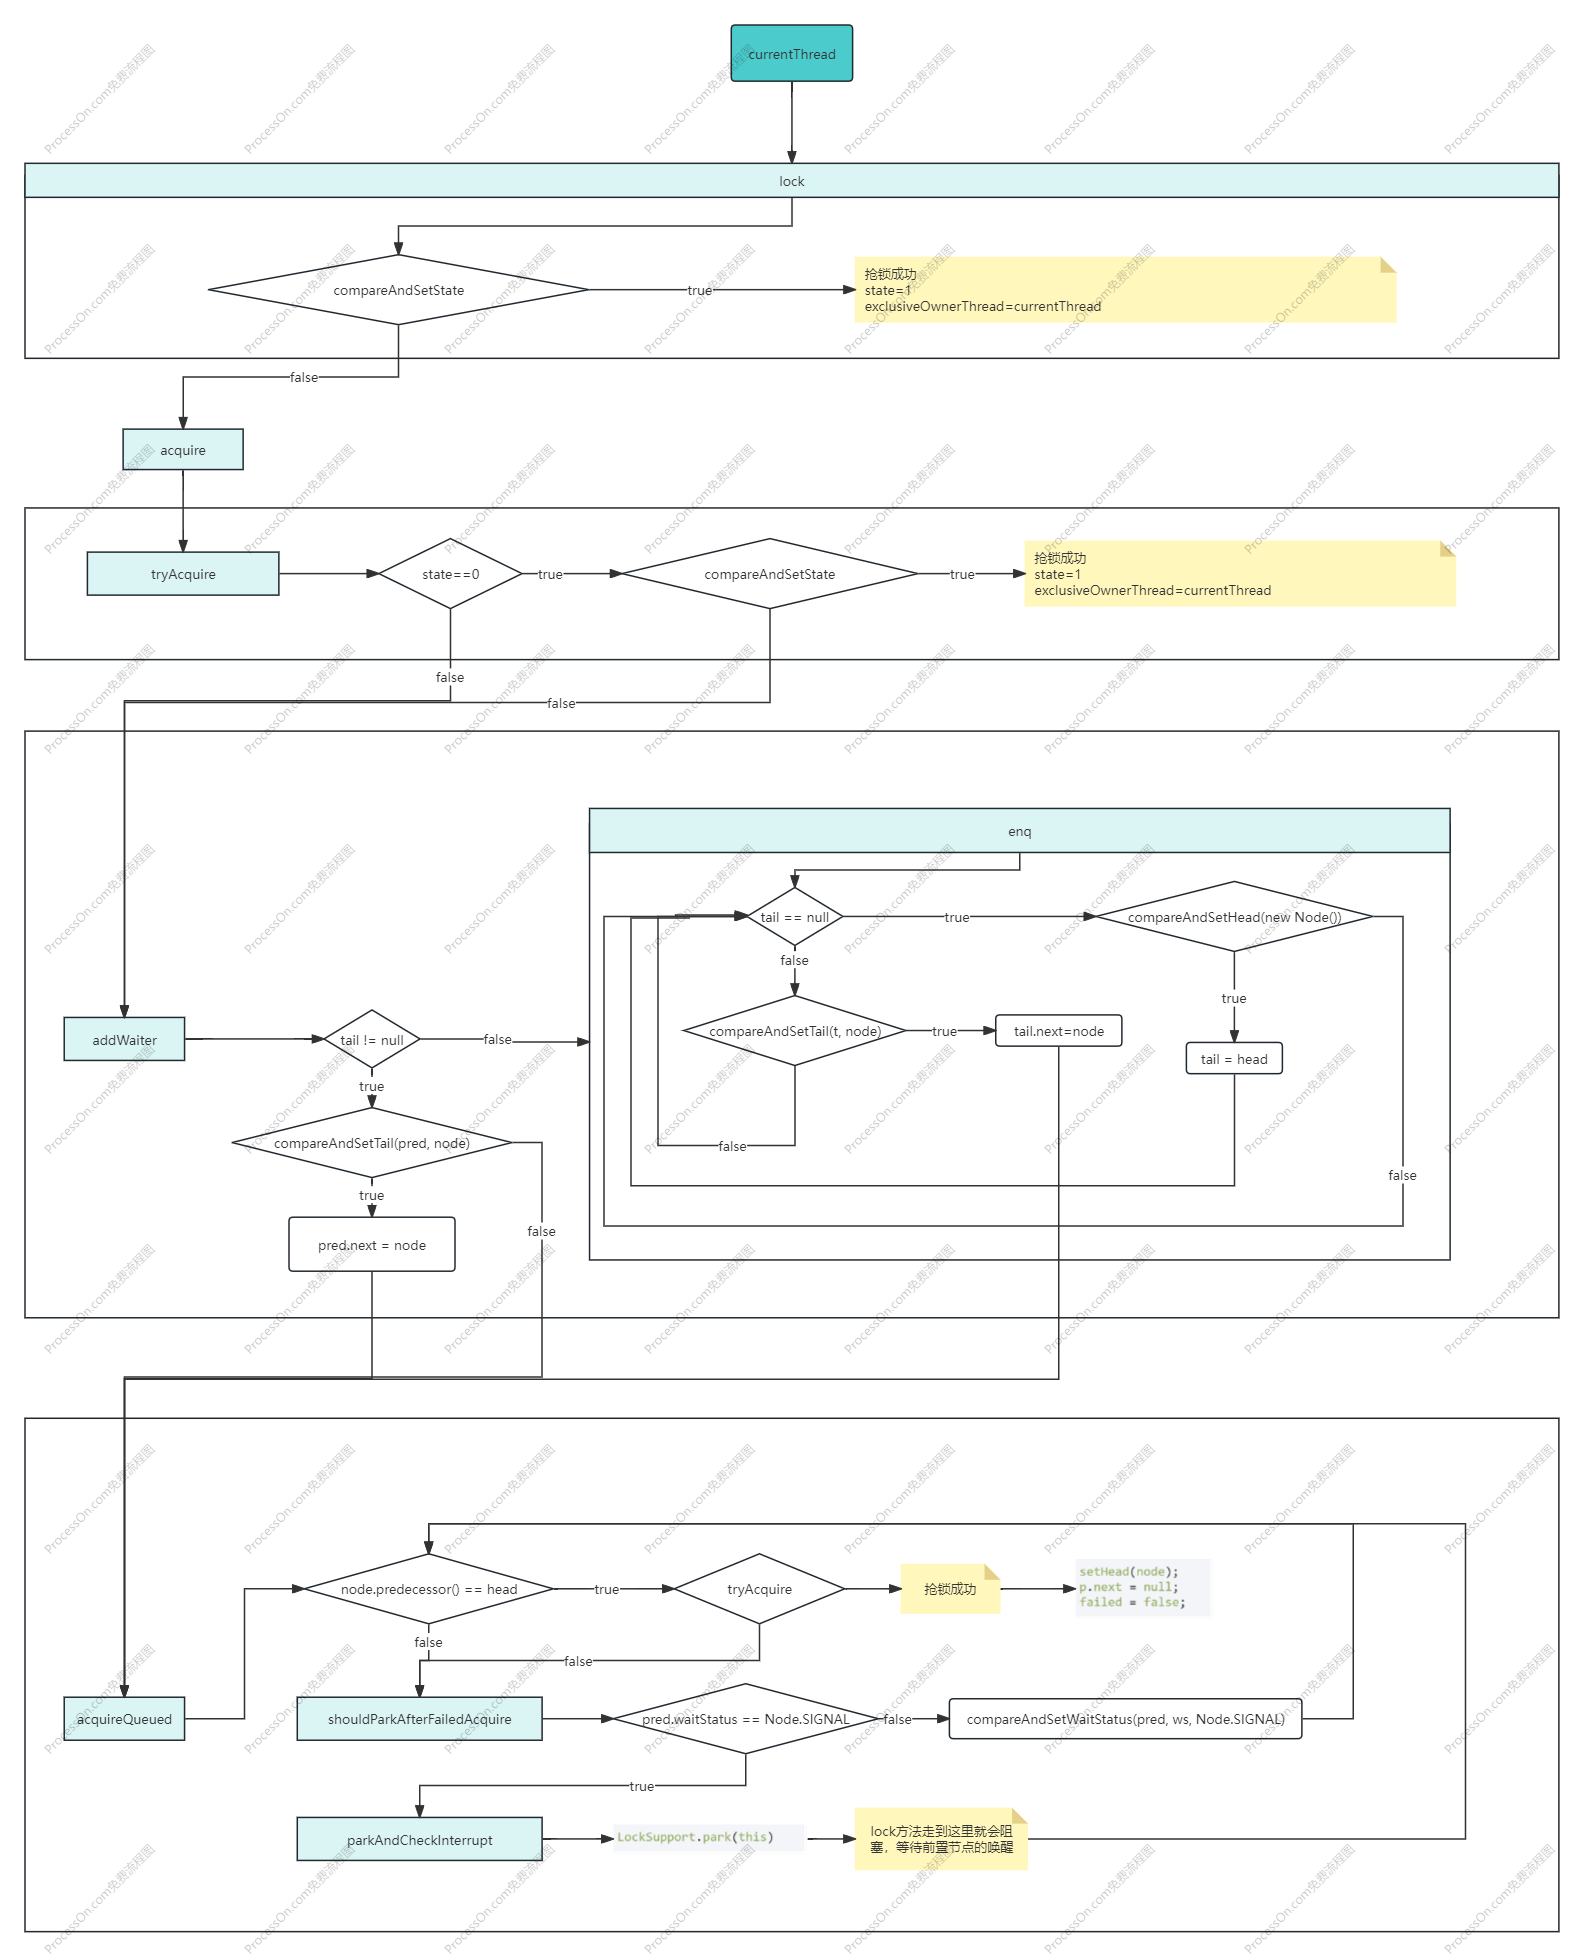
}4.3) acquireQueued

// 这里Node传入的是创建的新节点
final boolean acquireQueued(final Node node, int arg) {
    boolean failed = true;
    try {
        boolean interrupted = false;
        // 无条件循环体
        for (;;) {
            // 获取到前置Node,此时前直接点就是head
            final Node p = node.predecessor();
            // 再次尝试获取锁,获取锁失败
            if (p == head && tryAcquire(arg)) {
                /*
                 * 此时前置节点线程已unlock,此线程已获取到锁
                 * 设置head节点为本节点,将前置节点的next属性置为null。
                 */
                setHead(node);
                p.next = null; // help GC
                failed = false;
                return interrupted;
            }
            /*
             * 第一次循环,前置节点的witeStatus值改为-1,shouldParkAfterFailedAcquire返回fasle,继续下一次循环
             * 第二次循环,则进入packAndCheckInterrupt方法,线程就阻塞在这里
             * 直到前置节点调用了unlock方法,LockSupport会给此线程通行证,则进入下一次循环
             */
            if (shouldParkAfterFailedAcquire(p, node) &&
                parkAndCheckInterrupt())
                interrupted = true;
        }
    } finally {
        if (failed)
            cancelAcquire(node);
    }
}

/*
 * 修改Node节点的witeStatus值为-1
 */
private static boolean shouldParkAfterFailedAcquire(Node pred, Node node) {
    //获取到前置节点的wateState值
    int ws = pred.waitStatus;
    //Node.SIGNAL=-1
    if (ws == Node.SIGNAL)
        return true;
    if (ws > 0) {
        do {
            node.prev = pred = pred.prev;
        } while (pred.waitStatus > 0);
        pred.next = node;
    } else {
        //修改前置节点的waitState为-1
        compareAndSetWaitStatus(pred, ws, Node.SIGNAL);
    }
    return false;
}

/*
 * 调用LockSupport.park()方法,阻塞线程。
 * 此处,我们的lock方法就阻塞在这里,也就完成了入队和等待的工作
 */
private final boolean parkAndCheckInterrupt() {
    // 此处则将当前线程阻塞。等待前置线程执行unlock方法
    LockSupport.park(this);// LockSupport会在后续讲解,主要就是使用底层unsafe类来实现线程的阻塞和唤醒
    return Thread.interrupted();
}
4.4 lock方法就完成了线程进入等待队列和阻塞的操作
5) unlock原理
public void unlock() {
    sync.release(1); //调用AQS的release方法
}
5.1) AQS的release源码
public final boolean release(int arg) {
    if (tryRelease(arg)) { // 这里调用ReentrantLock.Sync.tryRelease方法
        Node h = head; // 拿到头节点
        if (h != null && h.waitStatus != 0)
            unparkSuccessor(h);// 进行后置节点的唤醒操作
        return true;
    }
    return false;
}
5.2) ReentrantLock.Sync.tryRelease源码
protected final boolean tryRelease(int releases) {
    // 获取AQS的state值
    int c = getState() - releases;
    if (Thread.currentThread() != getExclusiveOwnerThread())// 判断当前线程是否等于持有锁的线程
        throw new IllegalMonitorStateException();
    boolean free = false;
    if (c == 0) {
        // 如果c == 0,表示已经到多重锁的最外层,可以释放锁资源了。
        free = true;
        // 设置当前占有锁资源的线程为null
        setExclusiveOwnerThread(null);
    }
    // 设置AQS的state值
    setState(c);
    return free;
}
5.3) AQS.unparkSuccessor方法源码
private void unparkSuccessor(Node node) {
    //ws = -1
    int ws = node.waitStatus;
    if (ws < 0)
        // 修改头节点的waitStatus值为0
        compareAndSetWaitStatus(node, ws, 0);

    // 获取到头节点的下一个节点
    Node s = node.next;
    if (s == null || s.waitStatus > 0) {
        s = null;
        for (Node t = tail; t != null && t != node; t = t.prev)
            if (t.waitStatus <= 0)
                s = t;
    }
    if (s != null)
        // 唤醒下一个排队的线程
        LockSupport.unpark(s.thread);
}
2 synchorized
2.1 使用示例
2.1.1 锁代码块
static String LOCK_STR = "LOCK";

public void syncMethod1() {
    // synchronized关键字锁对象的方式
    synchronized (this) {
    }
}

public void syncMethod3() {
    // synchronized关键字锁静态变量
    synchronized (LOCK_STR) {
    }
}
2.1.2 方法上加synchorized关键字
//普通方法上加锁,代表锁的是当前对象
public synchronized void syncMethod2() {
}
//静态方法枷锁,代表锁的是当前对象对应的Class
public synchronized static void syncMethod4(){
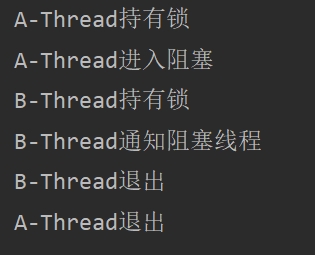
}2.2 阻塞和唤醒
public synchronized void method1() {
    System.out.println(Thread.currentThread().getName() + "持有锁");
    try {
        System.out.println(Thread.currentThread().getName() + "进入阻塞");
        this.wait();
    } catch (InterruptedException e) {
        e.printStackTrace();
    }
    System.out.println(Thread.currentThread().getName() + "退出");
}

public synchronized void method2() {
    System.out.println(Thread.currentThread().getName() + "持有锁");
    System.out.println(Thread.currentThread().getName() + "通知阻塞线程");
    this.notify();
    System.out.println(Thread.currentThread().getName() + "退出");
}

public static void main(String[] args) {
    SynchorizedDemo demo = new SynchorizedDemo();
    new Thread(() -> demo.method1(), "A-Thread").start();
    new Thread(() -> demo.method2(), "B-Thread").start();
}
执行结果
lock3 注意事项
- wait和notify成对出现
- 必须在持有锁的情况下使用
2.3 synchorized实现原理
2.3.1 字节码角度
- 同步代码块,通过monitorenter和monitorexit实现
- 同步方法,通过ACC_SYNCHONIZED访问标识,会先检查方法是否由ACC_SYHCHONIZED标识,如果有会去竞争锁,执行完成释放锁
- 静态同步方法,通过ACC_STATIC和ACC_STATIC_SYNCHONIZED标识
示例
public class SyncDemo {
    static String LOCK_STR = "LOCK";

    public void syncMethod1() {
        synchronized (this) {
        }
    }

    public void syncMethod3() {
        synchronized (LOCK_STR) {
        }
    }

    public synchronized void syncMethod2() {
    }

    public synchronized static void syncMethod4() {
    }
}
编译,得到class文件
javac SyncDemo.javajavap对SyncDemo.class字节码进行反汇编
javap -c SyncDemo.class返回如下结果
Compiled from "SyncDemo.java"
public class com.cqsiri.jucstudy.sync.SyncDemo {
  static java.lang.String LOCK_STR;

  public com.cqsiri.jucstudy.sync.SyncDemo();
    Code:
       0: aload_0
       1: invokespecial #1                  // Method java/lang/Object."<init>":()V
       4: return

  public void syncMethod1();
    Code:
       0: aload_0
       1: dup
       2: astore_1
       3: monitorenter // 获取锁
       4: aload_1
       5: monitorexit  // 释放锁
       6: goto          14
       9: astore_2
      10: aload_1
      11: monitorexit  // 异常退出释放锁
      12: aload_2
      13: athrow
      14: return
    Exception table:
       from    to  target type
           4     6     9   any
           9    12     9   any

  public void syncMethod3();
    Code:
       0: getstatic     #2                  // Field LOCK_STR:Ljava/lang/String;
       3: dup
       4: astore_1
       5: monitorenter  // 获取锁资源
       6: aload_1
       7: monitorexit  //  释放锁
       8: goto          16
      11: astore_2
      12: aload_1
      13: monitorexit  // 异常释放锁
      14: aload_2
      15: athrow
      16: return
    Exception table:
       from    to  target type
           6     8    11   any
          11    14    11   any

  // 方法上加上synchorized关键字
  public synchronized void syncMethod2();
    Code:
       0: return

  // 方法上加上synchorized关键字
  public static synchronized void syncMethod4();
    Code:
       0: return

  static {};
    Code:
       0: ldc           #3                  // String LOCK
       2: putstatic     #2                  // Field LOCK_STR:Ljava/lang/String;
       5: return
}
2.3.2 底层原理
ObjectMonitor 管程,ObjectMonitor会记录锁被谁持有,进入了几次等信息
3 synchorized和ReentrantLock的区别
- synchronized是java关键字,Lock是java类
- synchronized会自动释放锁,Lock需要在finally中手动释放,否则容易产生死锁,Lock可以判断是否获取到锁
- synchronized的锁可重入,不可中断,非公平。Lock的锁可重入,可中断,可公平