RabbitMQ 消息中间件
简介
RabbitMQ是一个实现了AMQP(Advanced Message Queuing Protocol)高级消息队列协议的消息队列服务,用Erlang语言。是面向消息的中间件。
你可以把它想像成一个邮局:你把信件放入邮箱,邮递员就会把信件投递到你的收件人处。在这个比喻中,RabbitMQ是一个邮箱、邮局、邮递员。RabbitMQ和邮局的主要区别是,它处理的不是纸,而是接收、存储和发送二进制的数据——消息。
业务场景
异步、解耦
比如订单创建完成后,给APP推送消息、短信消息、邮箱消息等,就可以推送到队列,通过多个不同的消息消费者来发送不同的消息。同时也实现了解耦
流量削峰填谷
比如秒杀的活动,短时间内涌入大量的请求,服务负载过高则容易导致OOM或者影响到其他业务的处理,此时则可以先将请求的内容或者参数写入到队列,后续由消费者进行消费。如果队列到达最大长度则可以根据业务进行其他的处理。
快速开始
Springboot整合RabbitMQ
分别创建生产者和消费者,相同的配置如下
maven坐标
<dependency>
    <groupId>org.springframework.boot</groupId>
    <artifactId>spring-boot-starter-amqp</artifactId>
</dependency>
application.yml
spring:
  rabbitmq:
    host: 192.168.163.128
    port: 5672
    username: admin
    password: admin
五种模型
Basic Queue 简单模型,一对一消费,一个消费者只绑定一个队列

rabbit12 消费者代码
创建一个配置类,来创建对应的队列
@Configuration
public class RabbitMQConfig {
	/*
	 * springboot会询问rabbitmq,如果没有此队列,会进行创建
	 * durable代表持久化消息,如果采用nondurable()方法,那么在rabbitmq重启后消息会丢失
	 */
    @Bean
    public Queue simpleQueue() {
        return QueueBuilder.durable("simple_queue").build();
    }
}
监听代码,采用@RabbitListener注解进行监听
@Component
public class MyRabbitListener {

    @RabbitListener(queues = "simple_queue")
    public void listenerSimpleQueue(String msg) {
        System.out.println("listenerSimpleQueue receive message: " + msg);
    }
}
生产者
@SpringBootTest
public class RabbitmqTest {

    @Autowired
    RabbitTemplate rabbitTemplate;

    @Test
    public void sendSimpleQueue() {
        for (int i = 0; i < 10; i++) {
            rabbitTemplate.convertAndSend("simple_queue", "message:" + i + ",time:" + LocalDateTime.now());
        }
        System.out.println("消息发送成功");
    }
}
先启动消费者,在启动生产者
生产者控制台

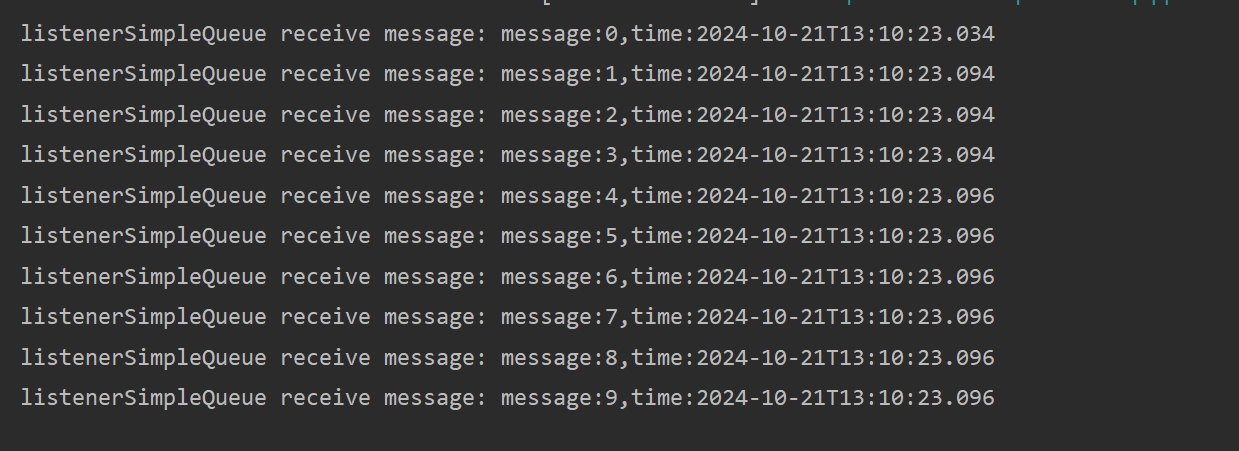
rabbit1 消费者控制台,成功消费消息
rabbit2
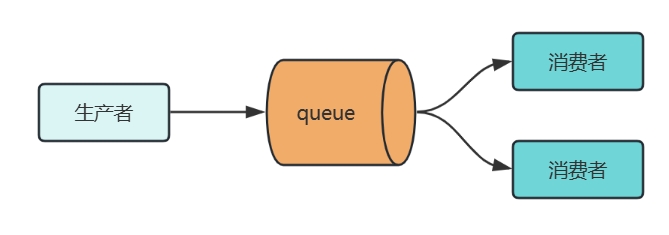
Work Queue工作队列,多对一消费,多个消费者绑定一个队列
rabbit17 增加配置,才能模拟出结果
spring:
  rabbitmq:
    listener:
      simple:
        # 每次只能接收一个消息,消费完成才能进行下一个消息的消费
        prefetch: 1
在前一种模型上,增加一个消费者
@RabbitListener(queues = "simple_queue")
public void listenerSimpleQueue(String msg) {
    System.out.println("消费者1 receive message: " + msg);
    // 模拟业务处理,一个消费者快,一个消费者慢
    try {
        TimeUnit.MILLISECONDS.sleep(100);
    } catch (InterruptedException e) {
        e.printStackTrace();
    }
}

@RabbitListener(queues = "simple_queue")
public void listenerSimpleQueue2(String msg) {
    System.out.println("消费者2 receive message: " + msg);
    // 模拟业务处理,一个消费者快,一个消费者慢
    try {
        TimeUnit.MILLISECONDS.sleep(50);
    } catch (InterruptedException e) {
        e.printStackTrace();
    }
}
启动生产者后查看消费者控制台
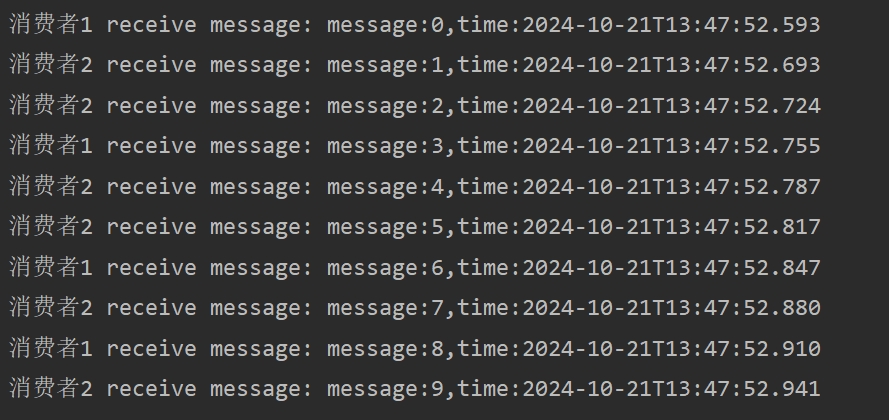
rabbit3 可以发现两个消费者都参与了消费,消费者2睡眠时间更短(处理速度更快),则比消费者1多消费了消息
Publish/Subscribe发布订阅模型
Direct 直连型交换机
- 直连型交换机背后的路由算法很简单,消息会传送给绑定键与消息的路由键完全匹配的那个队列
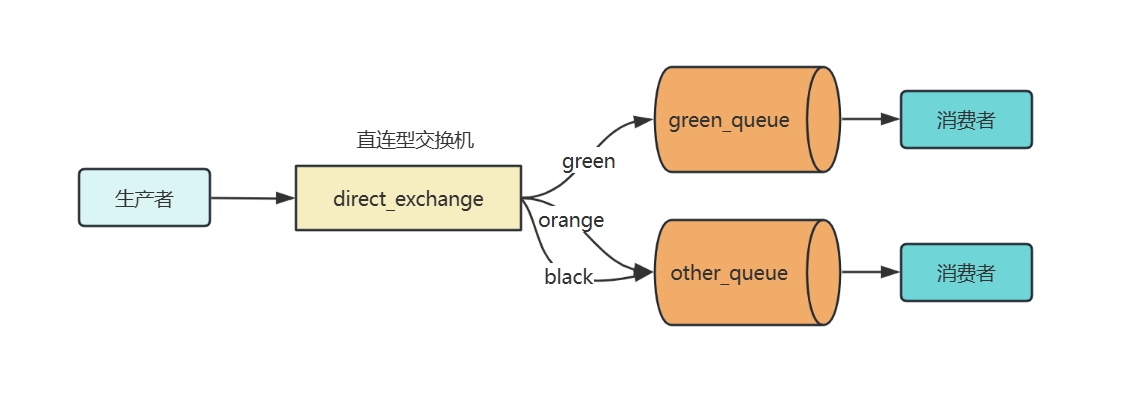
rabbit14 这种配置下,我们可以看到有两个队列Q1、Q2绑定到了直连交换机X上。第一个队列用的是(orange)绑定键,第二个有black、green两个绑定键,在此设置中,发布到交换机的带有orange路由键的消息会被路由给队列Q1。带black或green路由键的消息会被路由给Q2。其他的消息则会被丢弃。
代码
在consumer项目配置队列和交换机
@Bean
public Queue greenQueue() {
    return QueueBuilder.durable("green_queue").build();
}

@Bean
public Queue otherQueue() {
    return QueueBuilder.durable("other_queue").build();
}


//创建直连型交换机
@Bean
public DirectExchange directColorExchange() {
    return ExchangeBuilder.directExchange("color_exchange").build();
}

//绑定green路由key直连型交换机
@Bean
public Binding bindingGreenColorToQueue() {
    return BindingBuilder.bind(greenQueue())
        .to(directColorExchange())
        .with("green");
}

//绑定orange路由key直连型交换机
@Bean
public Binding bindingOrangeColorToQueue() {
    return BindingBuilder.bind(otherQueue())
        .to(directColorExchange())
        .with("orange");
}

//绑定orange路由key直连型交换机
@Bean
public Binding bindingBlackColorToQueue() {
    return BindingBuilder.bind(otherQueue())
        .to(directColorExchange())
        .with("black");
}
消费者
@RabbitListener(queues = "green_queue")
public void listenerOrangeQueue(String msg) {
    System.out.println("green消费者 receive message: " + msg);
}

@RabbitListener(queues = "other_queue")
public void listenerBlackQueue(String msg) {
    System.out.println("other消费者 receive message: " + msg);
}
生产者
@Test
public void sendColorQueue() {
    rabbitTemplate.convertAndSend("color_exchange", "black", "black_message");
    rabbitTemplate.convertAndSend("color_exchange", "orange", "orange_message");
    rabbitTemplate.convertAndSend("color_exchange", "green", "green_message");
    System.out.println("消息发送到交换机成功");
}
消费者控制台

rabbit5
Fanout 扇形交换机
扇形交换机将消息路由给绑定到自身的所有消息队列,也就是说路由键在扇形交换机里没有作用,故消息队列绑定扇形交换机时,路由键可为空。这个模式类似于广播
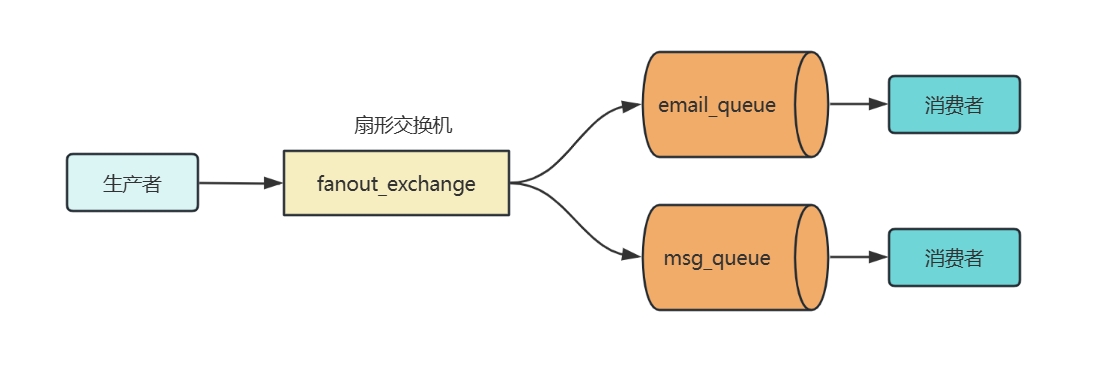
rabbit15 创建队列和交换机,并进行绑定
// 创建队列
@Bean
public Queue msgQueue() {
    return QueueBuilder.durable("msg_queue").build();
}

// 创建邮箱队列
@Bean
public Queue emailQueue() {
    return QueueBuilder.durable("email_queue").build();
}

// 绑定扇形交换机和队列
@Bean
public Binding bindMsgQueueToMsgExchange() {
    return BindingBuilder.bind(msgQueue())
        .to(messageFanoutExchange());
}

@Bean
public Binding bindEmailQueueToMsgExchange() {
    return BindingBuilder.bind(emailQueue())
        .to(messageFanoutExchange());
}
消费者
@RabbitListener(queues = "msg_queue")
public void listenerMsgQueue(String msg) {
    System.out.println("短信消息消费者 receive message: " + msg);
}

@RabbitListener(queues = "email_queue")
public void listenerEmailQueue(String msg) {
    System.out.println("邮箱消息消费者 receive message: " + msg);
}
生产者
@Test
public void sendUserMessage() {
    rabbitTemplate.convertAndSend("msg_exchange", "", "{userId:'xxx',messageContent:'xxx'}");
    System.out.println("消息发送到交换机成功");
}
两个队列都收到了消息

rabbit7
Topic 主题交换机
交换机通过解析路由键来确认消息需要发送给队列。
topic交换机的路由键绑定时可以通过*号或者#号当作占位符。
- *(星号) 能够替代一个单词。
- #(井号) 能够替代零个或多个单词。
例:
交换机 路由 队列 topic_exchange *.*.color color_queue topic_exchange *.size.* size_queue topic_exchange style.*.* style_queue routingKey:
- style.size.color-->三个队列都会收到消息
- style.xx.color-->style、color两个队列收到消息
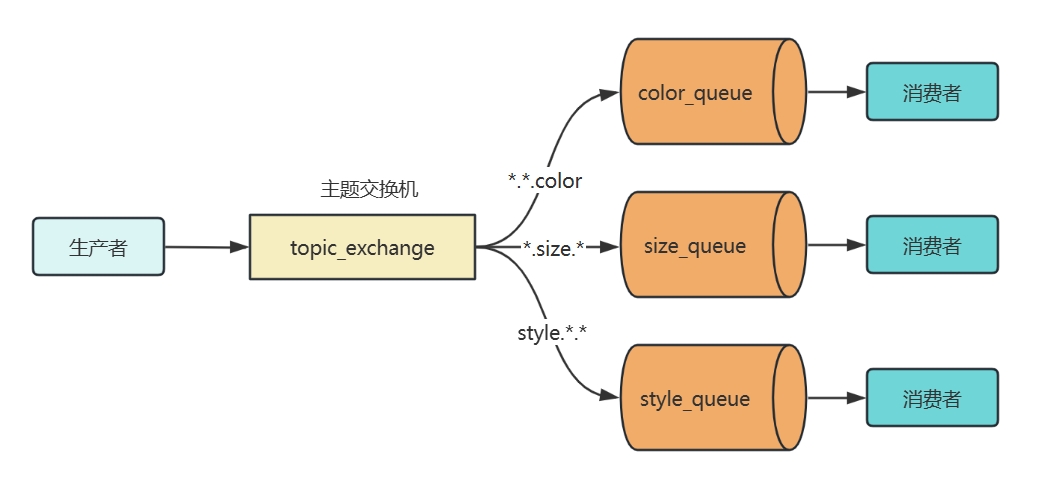
rabbit16 代码示例:
创建队列和交换机
@Bean
public Queue colorQueue() {
    return QueueBuilder.durable("color_queue").build();
}

@Bean
public Queue styleQueue() {
    return QueueBuilder.durable("style_queue").build();
}

@Bean
public Queue sizeQueue() {
    return QueueBuilder.durable("size_queue").build();
}

@Bean
public TopicExchange phoneTopicExchange() {
    return ExchangeBuilder.topicExchange("phone_topic_exchange").build();
}

@Bean
public Binding bindColorToPhone() {
    return BindingBuilder.bind(colorQueue())
        .to(phoneTopicExchange())
        .with("*.*.color");
}

@Bean
public Binding bindStyleToPhone() {
    return BindingBuilder.bind(styleQueue())
        .to(phoneTopicExchange())
        .with("style.*.*");
}

@Bean
public Binding bindSizeToPhone() {
    return BindingBuilder.bind(sizeQueue())
        .to(phoneTopicExchange())
        .with("*.size.*");
}
消费者
@RabbitListener(queues = "size_queue")
public void listenerSizeQueue(String msg) {
    System.out.println("listenerSizeQueue receive message: " + msg);
}

@RabbitListener(queues = "style_queue")
public void listenerStyleQueue(String msg) {
    System.out.println("listenerStyleQueue receive message: " + msg);
}

@RabbitListener(queues = "color_queue")
public void listenerColorQueue(String msg) {
    System.out.println("listenerColorQueue receive message: " + msg);
}
生产者
@Test
void sendTopicMessage() {
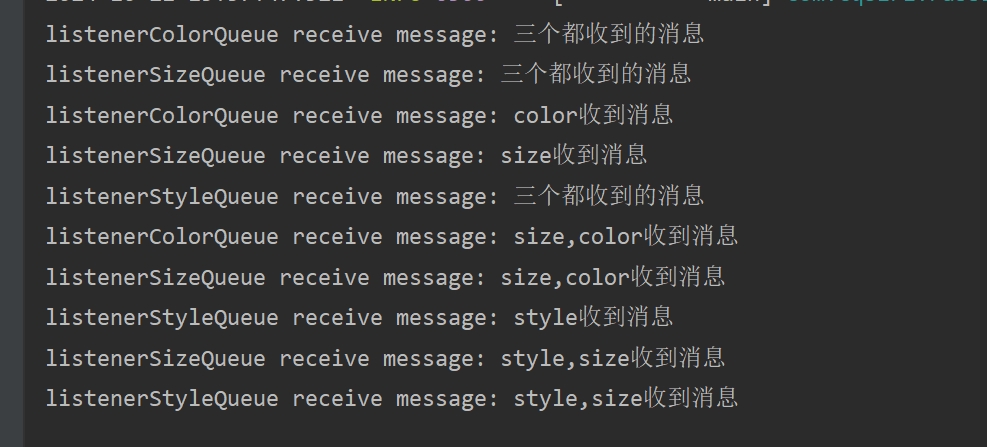
    rabbitTemplate.convertAndSend("phone_topic_exchange", "style.size.color", "三个都收到的消息");
    rabbitTemplate.convertAndSend("phone_topic_exchange", "style.a.b", "style收到消息");
    rabbitTemplate.convertAndSend("phone_topic_exchange", "a.size.b", "size收到消息");
    rabbitTemplate.convertAndSend("phone_topic_exchange", "a.b.color", "color收到消息");
    rabbitTemplate.convertAndSend("phone_topic_exchange", "a.size.color", "size,color收到消息");
    rabbitTemplate.convertAndSend("phone_topic_exchange", "style.size.xx", "style,size收到消息");

    System.out.println("消息发送到交换机成功");
}
执行结果
rabbit9
死信队列
消息变成死信消息一般是由于以下几条:
- 队列达到最大长度
- 消息过期
- 消息被拒绝,即消息确认机中手动确认的两种拒绝情况,并且不允许重新入队
超长或过期示例:
创建队列和交换机
/**
 * 创建正常队列
 * 对此队列不设置消费者。
 * 队列里面的消息过期后会发往死信队列
 * 队列消息长度已满后会发往死信队列
 */
@Bean
public Queue normalQueue() {

    return QueueBuilder.durable("normal_queue")
        // 死信交换机
        .deadLetterExchange("dead_exchange")
        // 消息过期时间
        .ttl(10000)
        // 死信交换机路由
        .deadLetterRoutingKey("dead_routing")
        //队列最大长度
        .maxLength(5)
        .build();
}

// 创建死信队列
@Bean
public Queue deadQueue() {
    return QueueBuilder.durable("dead_queue")
        .build();
}

// 死信交换机其实也是一个正常的直连交换机
@Bean
public DirectExchange deadExchange() {
    return ExchangeBuilder.directExchange("dead_exchange").build();
}

// 绑定死信队列和交换机
@Bean
public Binding bindDeadToDeadExchange() {
    return BindingBuilder.bind(deadQueue())
        .to(deadExchange())
        .with("dead_routing");
}
消费者
// 监听死信队列
@RabbitListener(queues = "dead_queue")
public void listenerDeadQueue(String msg) {
    System.out.println("listenerDeadQueue,time:" + LocalDateTime.now() + " receive message: " + msg);
}
生产者
@Test
public void sendDeadMessage() throws InterruptedException {
    for (int i = 1; i <= 10; i++) {
        String message = "正常message,发送时间:" + LocalDateTime.now() + ",序号:" + i;
        rabbitTemplate.convertAndSend("normal_queue", message);
        //也可以通过设置消息的过期时间来发送死信消息。
        //消息设置的过期时间和死信队列的过期时间,以短的时间为准
      //MessageProperties properties = new MessageProperties();
      //properties.setExpiration("5000");
      //rabbitTemplate.convertAndSend("normal_queue", new Message(message.getBytes(), properties));
        TimeUnit.MILLISECONDS.sleep(100);
    }
    System.out.println("消息发送到交换机成功");

}
消费者控制台:

说明:
- 队列最大长度5,超过长度会抛弃最先进入的消息,则最先进入的消息被发往死信交换机。
- 当后面5条消息的ttl时间一到,也被发往死信交换机
消息拒绝发往死信队列示例:
前面的基础上增加一个消费者监听normal_queue队列,然后拒绝消息
@RabbitListener(queues = "normal_queue", ackMode = "MANUAL")
public void listenerNormalQueue(String msg, Channel channel, @Header(AmqpHeaders.DELIVERY_TAG) long tag) {
    System.out.println("listenerNormalQueue,time:" + LocalDateTime.now() + " receive message: " + msg);
    try {
        channel.basicReject(tag, false);
        System.out.println("listenerNormalQueue,拒绝消息 receive message: " + msg);
    } catch (IOException e) {
        e.printStackTrace();
    }
}
生产者发送消息查看控制台
消息被拒绝消费后被发往死信队列

rabbit11
ACK 消息确认机制
为了保证消息从队列可靠的达到消费者,RabbitMQ 提供了消息确认机制(Message Acknowledgement)。消费者在订阅队列时,可以指定 autoAck 参数,当 autoAck 参数等于 false 时,RabbitMQ 会等待消费者显式地回复确认信号后才从内存(或者磁盘)中移除消息(实际上是先打上删除标记,之后在删除)。当 autoAck 参数等于 true 时,RabbitMQ 会自动把发送出去的消息置为确认,然后从内存(或者磁盘)中删除,而不管消费者是否真正地消费到了这些消息。
采用消息确认机制后,只要设置 autoAck 参数为 false,消费者就有足够的时间处理消息(任务),不用担心处理消息过程中消费者进程挂掉后消息丢失的问题,因为 RabbitMQ 会一直等待持有消息直到消费者显式调用 Basic.Ack 命令为止。
手动消息确认的配置
配置文件
spring.rabbitmq.listener.simple.acknowledge-mode=manual # auto是自动签收注解配置
@RabbitListener(queues = "color_queue", ackMode = "MANUAL")
消息确认的三个方法
basicAck
/*
 * 1.deliveryTag唯一标识 ID,它代表了 RabbitMQ 向该 Channel 投递的这条消息的唯一标识 ID
 *   是一个单调递增的正整数,deliveryTag 的范围仅限于 Channel
 * 2.multiple是否批处理,当该参数为 true 时,则可以一次性确认 delivery_tag 小于等于传入值的所有消息
 */
void basicAck(long deliveryTag, boolean multiple)
basicNack
/*
 * 1.deliveryTag
 * 2.multiple
 * 3.requeue 是否需要重新入队。true重新入队,以便发送给下一位消费者;fasle rabbitmq会将消息立即移除
 */
void basicNack(long deliveryTag, boolean multiple, boolean requeue)
basicReject
/*
 * 同basicNack方法,但是一次只能拒绝一条消息
 */
void basicReject(long deliveryTag, boolean requeue)
代码示例:
@RabbitListener(queues = "simple_queue")
public void listener1(String message, Channel channel, @Header(AmqpHeaders.DELIVERY_TAG) long tag) {
    System.out.println("消费者2进行消费:" + message);
    try {
        TimeUnit.MILLISECONDS.sleep(100);
        channel.basicAck(tag, false);
    } catch (Exception e) {
        try {
            // 失败则丢弃消息
            channel.basicReject(tag, false);
        } catch (IOException ex) {
            ex.printStackTrace();
        }
    }
}
